COMP CAMS® " How -To " - Valve Lash Adjustment
SOLID LIFTER CAMSHAFTS
Once again, the most important part is to remember to adjust just one valve on one cylinder at a time - starting with #1 and working your way through the firing order. To begin, check the spec card that came with your cam for the correct valve lash specifications. All COMP Cams® valve lash settings are "hot" settings, but will work for initial start-up as well.
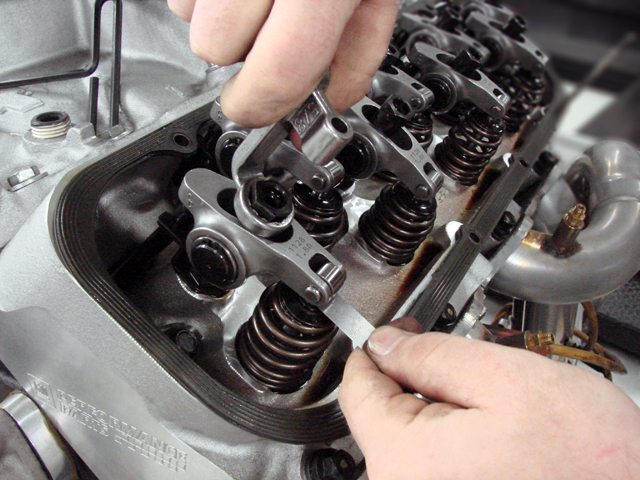
Rotate the crankshaft by hand until the exhaust valve begins to open on the #1 cylinder, adjust the intake valve by loosening the adjusting nut slightly until you feel lash on the rocker arm. Now you can set the lash on the intake valve. Spin the intake rocker nut down with the correct thickness feeler gauge inserted between the valve stem and the tip of the rocker arm. Tighten the adjusting nut until there's a slight drag when moving the feeler gauge. DO NOT OVERTIGHTEN. After setting the lash on the #1 cylinder intake valve, put a magic marker across the top of the rocker to assure yourself it has been adjusted. Following this procedure, carefully adjust all intake valves.
To adjust the exhaust valve, rotate the crankshaft until the intake pushrod opens the valve all the way on the #1 cylinder and then begins to close (about ½ the way back down). With the correct feeler gauge, adjust the exhaust rocker nut using the same procedure as with the intake rocker above. Repeat for each cylinder, marking each rocker arm once it has been adjusted.
After setting your valve lash with the engine cold, it's time to start it up and break it in to achieve normal operating temperatures. Due to thermal expansion, your valve lash should be tighter. Repeat the entire adjustment process to ensure your valve lash matches camshaft specifications, once again marking the rocker arm that have been adjusted. When finished, the rocker arms should all have an "X" mark on them - one mark for the first adjustment, another for the second.


How to adjust Valve Lash
Regardless of the type of camshaft you are running (hydraulic vs. solid, flat tappet vs. roller, etc.), properly setting the valve lash - the clearance between the rocker arm and valve stem tips - is a critical step toward achieving maximum power and durability.
