COMP CAMS ® " How -To " - Valve Lash Adjustment
Remove The Mystery From Properly Setting & Adjusting Valve Lash
Regardless of the type of camshaft you are running (hydraulic vs. solid, flat tappet vs. roller, etc.), properly setting the valve lash - the clearance between the rocker arm and valve stem tips - is a critical step toward achieving maximum power and durability. When most people think of setting the valve lash or "running" the valves, they think of it as a highly-involved, difficult procedure which involves an engine builder or educated professional of some sort. This is not true. The process is quite simple, and it's something that you can do in your own garage. No matter if your engine is foreign or domestic, 4-6-8 cylinders, this walkthrough will make properly setting the valve lash with a solid or hydraulic camshaft seem like a walk in the park.
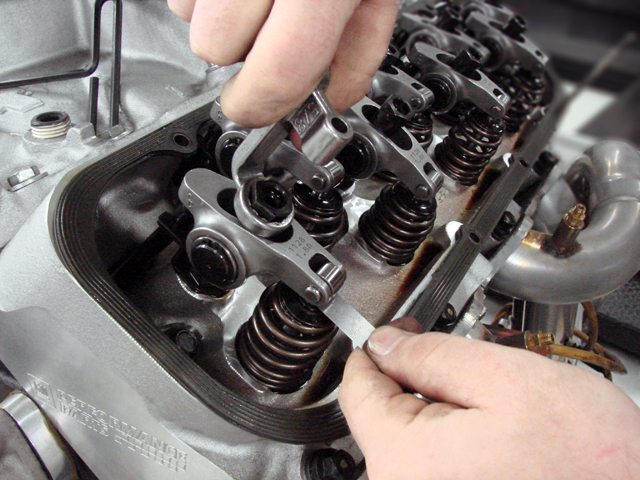
We'll start with rocker arm installation. Assuming the pushrods have been installed through the guide plate into the lifter socket and they are centered, thoroughly wash each rocker arm and its accessories with soap and hot water or denatured alcohol (lacquer thinner) - then blow dry. Note: It is recommended that all pushrods be pre-oiled through the pushrod holes.
Next, apply a small amount of COMP Cams® assembly lube to both the valve stem tips and the rocker arm's pushrod seats. Now you can install the rocker arm on the rocker stud. Apply a generous amount of COMP Cams® assembly lube to the rocker arm ball and position it on the rocker, with the flat side of the trunnion facing up. Make sure the pushrods are seated correctly in the lifters and the rocker arm seats. Use this exact process to install each and every rocker arm. DO NOT ROTATE THE ENGINE YET. THIS CAN RESULT IN BENT PUSHRODS!!!
With the stud properly lubricated, install the adjusting nut, but DO NO TIGHTEN it before going through the proper sequence of lifter adjustment. Tighten the nut with your fingers once the pushrod has no lash, but will still spin with your fingers. Repeat this process until all pushrods are seated and all rocker arms are installed.
Now, it's time to set the valve lash. The most important thing is to make sure you do one cylinder at a time, starting at the #1 cylinder and working your way around. After installing the dampener bolt back into the crankshaft, turn the engine over by hand in the direction of its normal rotation.
HYDRAULIC LIFTER CAMSHAFTS
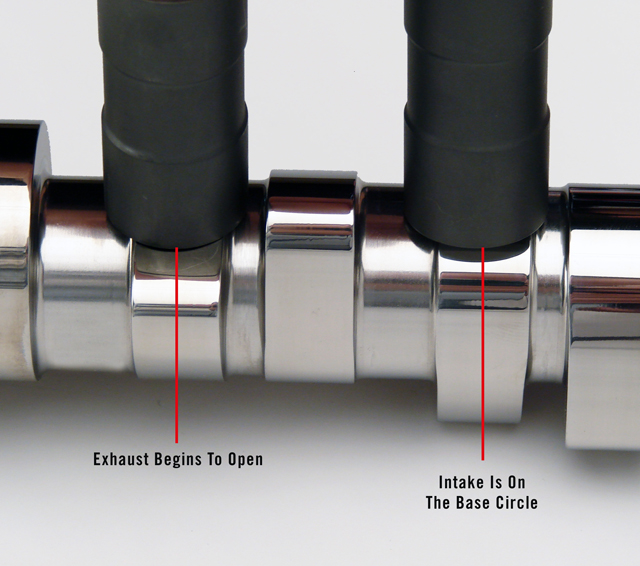
When the exhaust valve just begins to open on the #1 cylinder, adjust the #1 intake valve by loosening the adjusting nut slightly while spinning the pushrod until you feel lash in the rocker arm. Tighten the adjusting nut until the slack is taken out of the rocker arm and pushrod. Lightly turn the pushrod with your fingers as you tighten the adjusting nut, and you should feel a point where there is a little resistance. This is called zero lash - the point where you have taken all of the excess slack out of the pushrod. Turn the adjusting nut ½ turn past this point, giving you optimal pre-load for the rocker arm, pushrod and lifter. Follow this procedure by carefully adjusting each intake valve according to cylinder firing order.
Next, we'll adjust the exhaust valves. To do so, you need to turn the engine over until the intake pushrod moves all the way up. Rotate just past maximum lift, where the intake will begin to close. The lifter is now at the base circle, and the exhaust valve can be adjusted. Note: DO NOT go too far down (over halfway) past the point of maximum lift. If you go too far, you will be in the overlap cycle - where intake valve lash is being taken up as the exhaust valve begins to open.
Rotate the exhaust pushrod with your fingers and begin to tighten the exhaust adjusting nut. When you begin to feel resistance against the pushrod, you are once again at zero lash. Tighten the adjusting nut another ½ turn. DO NOT OVERTIGHTEN. Repeat through the firing order until the lash on every exhaust valve has been set.
Now it's time to double check, starting with cylinder #1. When the exhaust begins to open, check the intake. New hydraulic lifters shouldn't be pumped up yet, so you should be able to spin the pushrod with some resistance. Think of the hydraulic lifter as a shock absorber - and you want to be right there in the middle of it. Until you have oil pressure, you'll be able to push the lifter plunger into the bottom of the lifter. At that point, the lifter becomes solid. It might help to mark each rocker that has been set and then mark again each one that has been checked, giving the ones that are 100% finished a big "X" on the rocker arm body.


How to adjust Valve Lash
Regardless of the type of camshaft you are running (hydraulic vs. solid, flat tappet vs. roller, etc.), properly setting the valve lash - the clearance between the rocker arm and valve stem tips - is a critical step toward achieving maximum power and durability.
